Taping your boobs for a low cut dress will give you support, lift, and cleavage. With a plunging neckline, boob tape can be a superior choice to bras.
However, learning how to apply boob tape can be tricky, especially the first few times. Fortunately, you landed in the right place.
In this article, we explain in detail how to tape boobs for a low cut dress, with step-by-step instructions.
We’ll look into a couple of different ways to apply boob tape for a deep v dress, so you can choose whichever works best for you. Learning to use boob tape as explained in this article will hopefully be a total game-changer for you.
Let’s dive in!

How To Tape Boobs for a Low Cut Dress: Step-By-Step Instructions
Before you start to apply boob tape, there are certain things you need to consider.
First of all, you must ensure that your skin is clean and dry. The skin shouldn’t have oils and moisturizers on it, and it shouldn’t be irritated or sunburned. Oils and lotions can make the adhesive strip not stick as well.
The second thing to consider is whether you have extremely sensitive skin.
If for some reason you fear that your skin is extremely thin and sensitive, you can first test it. By doing so you ensure that you don’t have allergies to the tape and that your skin isn’t extremely sensitive.
You can test the skin by applying a very small patch of boob tape (1 inch by 1 inch is enough) on your breasts (or on your arm even) and keep it for 24 hours (or as long as you expect to wear the boob tape for). If there’s no reaction when you remove the patch, you can feel safe using more boob tape on your breasts.
On the other hand, if the skin is irritated or red, it’s probably best not to use that particular brand of boob tape. In that case, you should look for a hypoallergenic and latex-free boob tape.
Once you know that your skin is not extremely sensitive, and you’ve ensured that it’s clean and dry, you can safely use boob tape on your breasts.
There are many different ways to use boob tape with a low cut dress. Which style you should go with will mainly depend on what your low cut dress looks like. In this article, we’ll present a couple of different styles, so you can pick which one works best for your outfit.
In essence, you must tape your boobs in a way that the boob tape is not visible under the dress, but that it still provides support and lift.
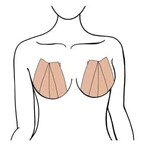
Style 1: Vertical Strips
The first way to apply boob tape for a low cut dress is by using vertical tape strips on your breasts. With this style, you apply 2-4 vertical strips on each breast, lifting them upwards and inwards.
This style can be used mainly for low cut dresses and backless dresses.

Here are the step by step instructions to achieve this look:
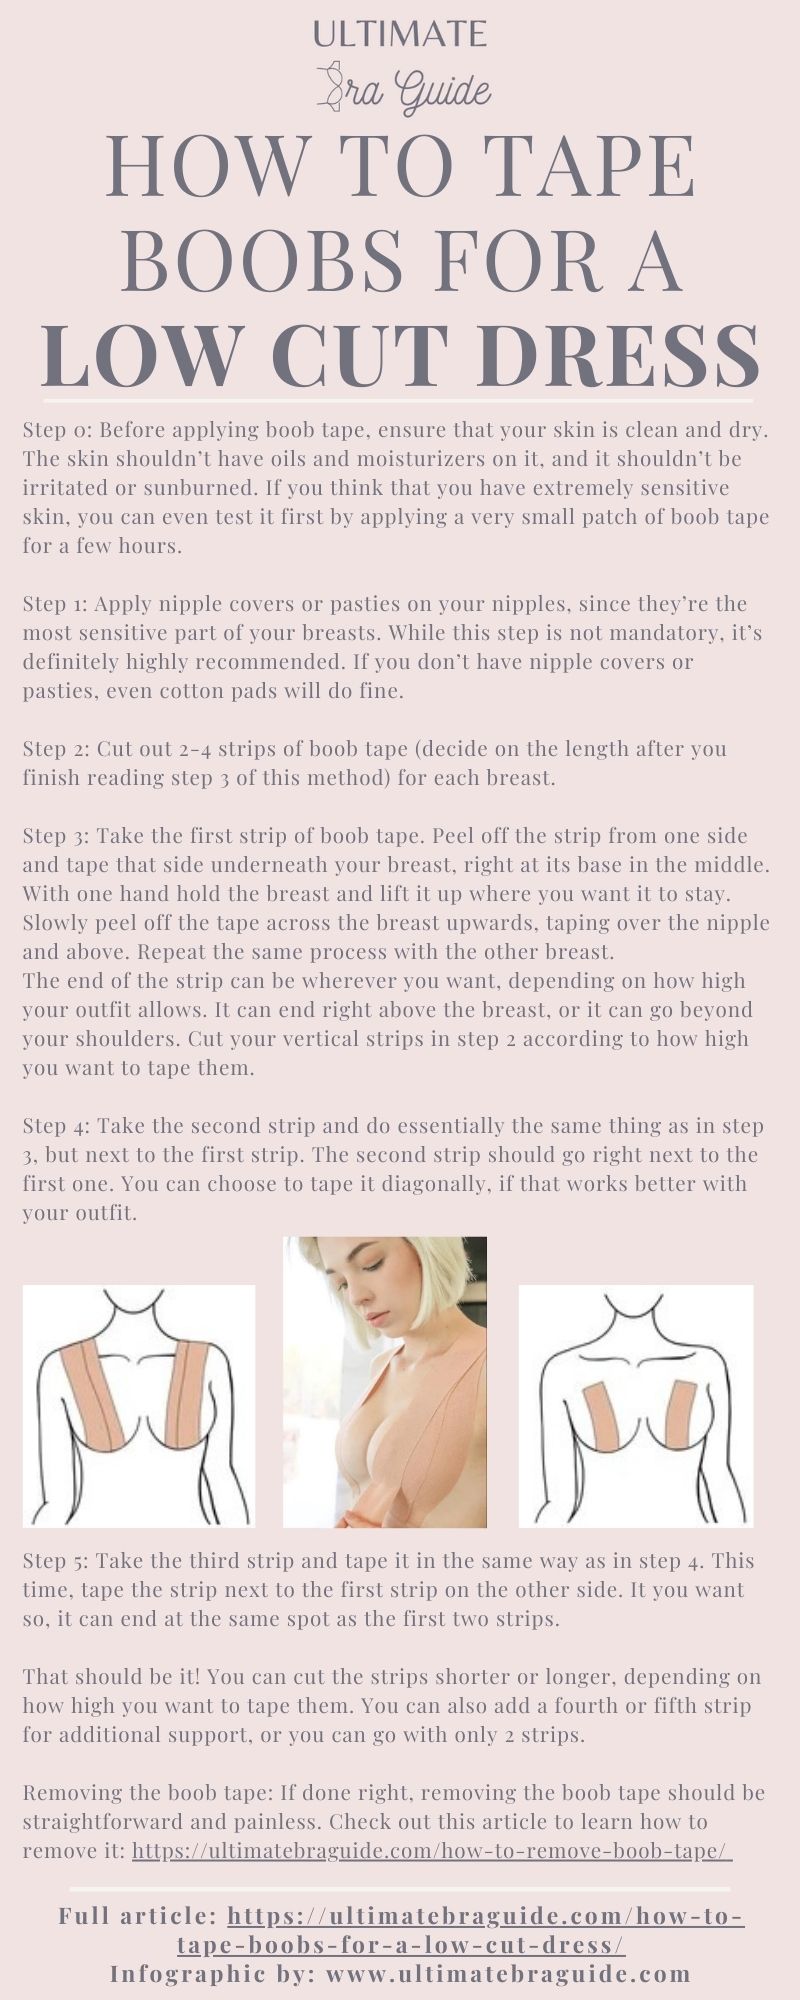
Step 1: Apply nipple covers or pasties on your nipples, since they’re the most sensitive part of your breasts. While this step is not mandatory, it’s definitely highly recommended.
Not only does it protect the sensitive nipples, but more importantly, it makes removing the boob tape a painless experience.
Extra tip: If you don’t have nipple covers or pasties handy, even cotton pads will do fine – it’s definitely better than nothing.
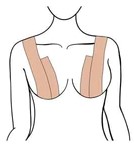
Step 2: Cut out 2-4 strips of boob tape (decide on the length after you finish reading step 3 of this method) for each breast.
Step 3: Take the first strip of boob tape. Peel off the strip from one side and tape that side underneath your breast, right at its base in the middle.
With one hand hold the breast and lift it up where you want it to stay. Slowly peel off the tape across the breast upwards, taping over the nipple and above. Repeat the same process with the other breast.
The end of the strip can be wherever you want, depending on how high your outfit allows. It can end right above the breast, or it can go beyond your shoulders.
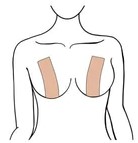
Keep in mind that the higher the strip ends, the more support it provides to your boobs. This is especially important for boobs that are on the bigger side.
Cut your vertical strips in step 2 according to how high you want to tape them.
You can use the vertical strips method even with strapless tops, if the strips end right above the breast.
Depending on your outfit, you can choose to tape the breast not straight above (across the nipple), but vertically on the side of the boob. This will allow you to wear really low cut dresses.

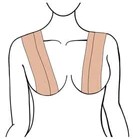
Step 4: Take the second strip and do essentially the same thing as in step 3, but next to the first strip. The second strip should go right next to the first one. You can choose to tape it diagonally, if that works better with your outfit.
That way, the strips start next to each other, but end on the exact same spot above the nipple. Repeat the same process with the other breast.
Step 5: Take the third strip and tape it in the same way as in step 4. This time, tape the strip next to the first strip on the other side. It you want so, it can end at the same spot as the first two strips.
In that way, the tape forms a triangle shape covering and lifting your whole breast. Repeat the same process with the other breast.
Extra tip: Don’t peel off the whole strip before taping. Instead, peel off just the tip, tape it to the skin where you want the boob tape to start, and then peel off the strip as you apply the tape.
That should be it! You can cut the strips shorter or longer, depending on how high you want to tape them. You can also add a fourth or fifth strip for additional support, or you can go with only 2 strips.
(Optional) Step 6: Depending on how low cut the outfit is, you can choose to add a horizontal strip at the end. To do this, cut a 12 inch (30 cm) boob tape strip.
Take the strip of boob tape. Lean forward slightly. Peel off the strip from one side and tape that side at the base of your breast (near your armpit), while you’re leaning forward. Slowly peel off the tape across the breasts to the other armpit, squeezing the boobs together as you go.
Don’t go straight across the boobs. Instead, go in a U-shape underneath your breasts, in order to push them upwards.
In this way, this strip of boob tape will push the boobs both inwards and upwards, making them perkier.
However, keep in mind that this optional step can only work if the outfit is not too deep. If it is, the horizontal strip will be visible, defeating its purpose.
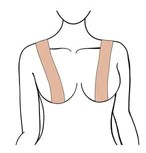
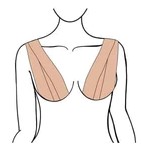
Style 2: Crossover Style
The vertical strips style works great for low cut dresses. However, it can’t be used with strapless dresses, since boob tape will be visible above the dress (unless the vertical strips are really short).
Therefore, we present the crossover style, which can be used when a dress is both strapless and low cut.
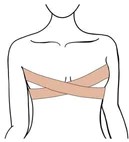
Here’s how to achieve the crossover look:
Step 1: Apply nipple covers or pasties on your nipples, since they’re the most sensitive part of your breasts. While this step is not mandatory, it’s definitely highly recommended.
Not only does it protect the sensitive nipples, but more importantly, it makes removing the boob tape a painless experience.
Extra tip: If you don’t have nipple covers or pasties handy, even cotton pads will do fine – it’s definitely better than nothing.
Step 2: Cut out 2 strips of boob tape, each of them 12 inches (30 cm) long. Once you do this method a few times, you can cut the strips shorter or longer, if that’s what works for you. You’ll also know how many boob tape strips work best for you.
Step 3: Take the first strip of boob tape. Peel off the strip from one side and tape that side at the base of your breast (near your armpit). Slowly peel off the strip and tape it across your body, ending up at your ribcage on the other side.
Unlike with the horizontal strips style, don’t go across the breasts to the other armpit. Instead, the tape should start at the base of the breast and end up a few inches lower on the other side, basically low on the ribcage.
Repeat the same process on the other side. Start from the base of your other breast, and tape the strip across the other side, ending up at the opposite ribcage.
Extra tip: Don’t peel off the whole strip before taping. Instead, peel off just the tip, tape it to the skin where you want the boob tape to start, and then peel off the strip as you apply the tape.
With the crossover style, you can wear a strapless top, since there’s no boob tape above your breasts. There’s no boob tape between your breasts either, so you can wear a low cut top.
The end result is something that will support and lift your boobs, and won’t be visible in a strapless and low cut dress.
Other Styles
Depending on your outfit, maybe none of the discussed styles will work for you. If that’s the case, feel free to get creative with how you tape your boobs.
After all, one of the best things about boob tape is that it can be used in a variety of different ways, and with any kind of outfit.
This is one of the huge advantages breast tape has over bras.
Regardless of your outfit, you can always find a way to use boob tape so that it provides support and lift without being visible. Here are a bunch of creative ideas on how to use boob tape:
How To Tape Boobs for a Low Cut Dress Infographic
Additional Tips for Using Boob Tape
- Keep in mind that it’s okay if you’re not satisfied with how you applied the boob tape the first time. Getting it right might take a little bit of getting used to it and a few tries.
- Practice makes perfect. After you apply boob tape 1-2 times, you’ll learn exactly how to get most out of your boob tape. You’ll also learn how much tape is enough so that it’s neither too tight nor too loose.
- One thing you can do is round the corners of the boob tape strips. That way, the sharp corners of the boob tape won’t catch on your clothes. Also, the boob tape strip definitely won’t peel off.
- If after putting on your outfit you notice that some boob tape is visible, you can carefully cut out the extra tape. Another thing you can do before using boob tape is to use nude eyeliner to draw the outline of your outfit on your skin. That way, you’ll know exactly where to put boob tape without it being visible.
- Use your hands to smooth wrinkles and keep the tape wrinkle-free. Don’t overthink it – small wrinkles won’t be visible through your clothes. However, try to avoid bigger wrinkles that can show through your clothes.
- Try to avoid using boob tape for a prolonged period of time (more than 8-10 hours). Using the boob tape for longer than that could potentially make removing it more difficult. If you end up using boob tape for more than 8-10 hours, try to remove the boob tape as soon as you can.
- Try to avoid stretching the boob tape too much. Although good boob tapes are very elastic, they work best with smaller amount of stretch. This is more important for the ends of the tape strips, which shouldn’t be overly stretched.
- If boob tape comes with instructions from the manufacturer, make sure to follow those.
- Feel free to be creative when following these instructions. If some step doesn’t work with your outfit, be sure to change the step in a way that works for you. For example, if you have a really deep v dress, you can place the vertical strips more towards the outside of the breast, instead of above it.
How To Remove Boob Tape
Once you have applied boob tape, you’ll eventually have to remove it. Generally, removing the boob tape is the only part of the process which can cause discomfort, but only if it’s not done right.
If you remove the boob tape following the instructions given below, it should be straightforward and painless. After all, boob tape is specifically designed to be used on your breasts.
Here’s the step-by-step guide on how to remove boob tape:
Step 1: Apply baby oil (could be olive, coconut, or another kind of oil) on the boob tape. This will dissolve the adhesive. Wait around 15 minutes.
Step 2: Start to remove the boob tape gently and carefully. Use one hand to slowly peel the tape off. With the other hand hold down the skin behind the tape. Move this hand as you peel the tape off, following where the tape used to be.
If you feel like the tape is not loose enough, apply more oil until it is.
Step 3: Repeat the same process for all strips of boob tape.
Step 4: After all strips of boob tape are removed, use a cotton pad to remove any remaining adhesive from the skin.
Step 5 (Optional): Moisturize your breasts.
When removing boob tape, keep in mind these additional tips:
- Don’t ever just rip the boob tape off like a band-aid.
- The process of removing the boob tape can get quite messy since it involves soaking the tape in oil. Therefore, it’s probably best to do it in the shower, or any place where making a mess isn’t a huge issue.
- If you don’t have any oil, you should be able to remove the boob tape more easily while taking a hot bath or a hot shower. Using lotion instead of oil is another option, although not as good.
- The longer you have boob tape on, the more it will stick to your skin. So, if you’ve had boob tape on for something like 8-10 hours, you may need to use more oil than you would otherwise.
Conclusion
Boob tape is probably the best option you have for rocking a deep v dress. But, applying boob tape takes some time to get used to. In this article, we dove deeply into the question of how to tape boobs for a low cut dress, giving step-by-step instructions.
We also touched upon removing boob tape, as well as what are your best options for buying boob tape.

The founder, editor, and writer of most articles on Ultimate Bra Guide. An experienced bra fitting specialist turned blogger. My website Ultimate Bra Guide has been featured in relevant publications such as Glamour, Bustle, Elite Daily, Alldaychic, Everyday Feminism, and so on. Get to know me better at our about page.